Friday, December 31, 2010

DIY Reusable Liner Soap Molds

A good friend of mine used this phrase "DIY til we DIE" in a recent email to me. I had to laugh because that totally describes us. Why pay huge $ for something made by someone else that I can make myself for next to nothing and performs every bit as good as the pricey purchased one (often better).

As a member of TheDishForum, I like to participate in several research swaps each year. Fragrance swaps are one of my favorites because we get to sample 50+ scents in one go. Making small test batches for these swaps requires small-ish molds. I generally like to make 16 oz batches so that a 1 oz bottle is used up in. a single batch. Here are the steps I used to make a triple log mold made totally to my bar specs for about $5.00. these little molds are absolute workhorses and paid for themselves after the first use.

Custom Triple Log Soap Mold for $5.00:
Materials:
- 6mm (1/4 inch) Craft foam (found at craft supply houses like Hobby Lobby)
- 1 sheet of Foam Board (the kind used for presentations that stands up on its own)
- Duct Tape (I personally use Nashua Brand)

Tools:

- Exacto Knife or razor knife or box cutter
- Ruler
- Self Healing mat (Didn't want to cut the table!)

Steps:
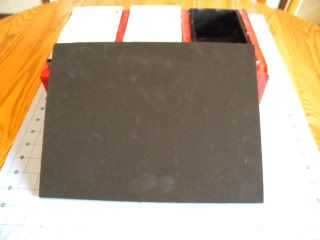


I wanted 6.25 x 3.25 x 2.5 inch logs for this swap, so I started cutting the foam into:

- one bottom piece (6.25 long x 3.25 wide)
- two long sides (3 tall x 6.25 long)
- two end pieces (3 tall x 3.5 long)


NOTE: MAKE SURE YOU USE THE 6mm craft foam. The 3mm and 2mm will not work for this application. They are simply too thin and tear very easily. I found bigger sheets of the 6mm on Ebay to make larger block molds.

Note2: Don't use the cheapo Dollar Store craft foam. The sheets are too thin and the color may leach onto your soap. these things will last you a very long time. Invest in the $1 sheets for the better closed cell foam.


I duct taped one side at a time to the bottom piece and then ran extra duct tape all around the outside to ensure it would all hold together. The little mold/liner ended up being waterproof and only bowed slightly when filled to the top with soap without any other support. I made 3 of these and they all worked out the same. They're not going to win any beauty prizes, but I like the colored duct tape tongue.gif .


Wanting a little more support on the sides I made a frame for all 3 liners out of ½ inch rigid foam board (used for presentations). $5.99 for a poster board on sale 50% off for $2.98). I used half of the sheet for this project. I cut out a base, 2 long sides, 2 short sides and 2 internal spacers and duct taped it all together. Sweet success.The liners fit snugly and pop out easily to unmold the soap.
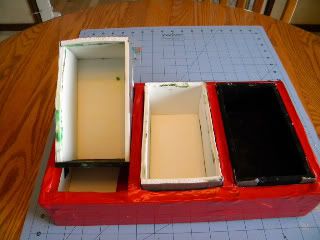
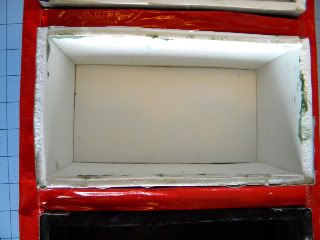

The photos of the whole setup were taken after the maiden batches. I didn't clean them so you could see how cleanly the soap unmolds. The soap unmolded perfectly after 12 hrs. It literally popped right out of the liners. The formula I used was high in castor (10%) and usually sticks a bit even to the mylar liners I have made before. (I did let it fully gel) Photo below is of log on its side to show bottom corner. Check out the sharp corners and smooth sides. (No wasted end cuts!)
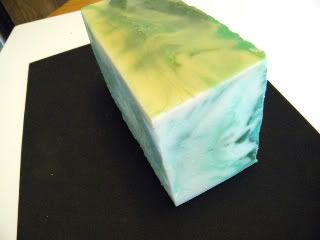


Costs for this triple log set up:
- 3 pieces of 6 mm craft foam (.99 each x 3 = $3)
- ½ sheet of foam core board ($1.50)
- Duct Tape (2.99 for the whole roll" let’s be generous and call it $.50 for this project)
- Total: $5.00 for 3 custom molds.
- Time: 10 minutes per liner. 10 minutes for the holder: 40 minutes including interruptions.


Note: The 6.25 inch logs I chose to make can be cut into 6 one inch bars (4.5+ oz) or 5 1.25 (5.5+ oz) inch thick bars with no wasted ends. I plan to reuse these for many, many, many small test batches. I would not go much larger with this foam-only system simply because the foam board and craft foam are not nearly as strong as wood.

I have also made large block molds and log molds using this foam liner method. They work brilliantly and last for countless batches. Occasionally a batch gets very hot in the mold and makes little moon craters on the outermost sides of the log/block. These scrape off effortlessly with a plastic scraper. In all honesty, once cut and packaged nobody ever notices the edges so I don't worry about it at all.

Fragrance does not stick in the foam since it's a closed cell material. If I get really messy and the liners seem dingy, I can just scrape them with a wooden spatula. They can be washed, just be aware that duct tape isn't friendly with water and your seams may begin to leak. Slap on a new piece of duct tape and you'll be back in business.

I hope someone finds this useful!

Friday, July 23, 2010

WREX-TV Crafts! Luxury Bubble Bath and GLOP!

WREX Crafts

Here are the recipes for the Bubble Bath and Glop made on the WREX Channel 13 morning show July 23rd.

Custom Bubble Bath
Soak your cares away using three simple ingredients: A bar of your favorite soap, Water and the secret ingredient: Glycerine.
Here's how to make a big quart bottle:
1 4 oz bar of real soap, like gentle Castille, shredded or grated into little bits
1 quart HOT water
2 oz liquid Glycerine (found in the pharmacy aisle near the witch hazel and isopropyl alcohols) Optional: Extra Scent.

Dissolve the soap bits in the hot water.

*Tip: put water and soap in a microwave safe bowl, microwave in 30 second increments just until the soap begins to melt. Stir to melt completely.

Add the glycerine and mix well.

Package in recycled bottles or new malibu tubes.

To use, squirt or pour a tablespoon or so under rapidly running water. Relax and enjoy!


Fragrance Ideas:
Sleepy Time:
6 drops Lavender
3 drops Chamomile


Winter Headcold:
6 drops Eucalyptus
3 drops peppermint
3 drops spearmint

Other ideas: visit www.RainbowMeadow.com

IDEAS: Pantry Bath Additives:
Skin Soother: Make your own colloidal oatmeal by running rolled or quick oats through your coffee grinder, blender or food processor. OR use baby oatmeal.

Milk Bath: Add up to a cup of powdered milk to the bath water.

Silky Smooth: up to 1/4 cup honey

Milk and Honey: powdered milk and honey! for real.


=-=-=-=-=-=-=-=-=-=-=-=-=-=-=-=-=-=-=-=-=-=-=--=-
GLOP!
What kid doesn't like gross stuff? Glop appeals to the kid in all of us.

Ingredients:
1 teaspoon Borax (like 20 mule team brand in the laundry aisle)
1 1/4 cup water - Divided
1 cup White Glue

In a medium size bowl:
Mix 1/2 cup very warm water with the 1 teaspoon of Borax. Make sure it dissolves completely.

In a separate bowl or cup mix the remaining water and all of the glue. Mix well. If you want colored glop, add a couple drops of food coloring to this mix.

Slowly pour the glue mixture into the bowl with the Borax and water. Stir rapidly and constantly to make the glop. It will come together rapidly, so be prepared!

Allow to sit for a few minutes then enjoy! Store in a sealed container or baggie in the fridge to prolong the life of the Glop.

Monday, June 7, 2010

Survey Says!

We recently participated as a vendor at the Klehm Arboretum Garden Fair. Hardy gardening friends braved the heat, humidity and stormy weather to find garden treasures and must-have new plants. We made a lot of new friends and reunited with old friends.

Sunday's foot traffic was a little slower than prior days, so I took the opportunity to put my customers to work. The last soap scent swap I participated in for the Soap Dish Forum introduced three new scents to me from a supplier I had not yet purchased from. The three fragrances that made the top of the list are: Bamboo Sugarcane, Madagascar Spice and Very Sexy For Him.

I offered each person walking into the Sweet Teagan's space a chance to vote on their favorites and give a general thumbs up/down. Wouldn't you know it everyone had very different opinions on every scent. Those loving Bamboo Sugarcane hated Spice and vice versa. The majority liked Very Sexy. Even though it is "for him" women liked it just as much. The field of potential fragrances didn't narrow by much, so I'm going to add them ALL to the August Lineup!

Thanks to all who took time to vote for your favorites. Hope to see you next year!!

Friday, April 16, 2010

Another WREX Segment!! Clean and Green

I was' 'green' long before it was trendy and cool. Call it Yankee Ingenuity or general frugality - doesn't matter which. The producer of the WREX morning show asked me to stop in for a quick segment about green cleaning today. Of course I was thrilled to talk about something I am so passionate about.

Here's a summary of what Laura Gibbs-Green and I spoke about:

Clean and Green

As seen on WREX TV
Keep your home "Fresh as a Daisy" with some inexpensive and simple tips.
Fact: The average home has at least 60 synthetic chemical cleansing products. That’s roughly 10 gallons of the stuff.

Go To Ingredients:
1. FREE: SUNLIGHT!
2. Good Old Soap and Water
3. Baking Soda ($.79)
4. Vinegar ($.66)
5. Lemons ($.33)

Optional:
6. Borax ($2.69)
7. Washing Soda ($2.69)

Tools:
1. Sponge ($.50)
2. Clean Spray Bottle ($.99)
3. Newspaper (free if you subscribe)

Room by Room:

Living Room & Bedrooms:
Air out pillows, heavy winter blankets, area rugs in bright, hot sunlight. A day or two will leave them smelling really fresh! This gives me time to clear clutter. My motto is still 2 things a day! My four options are: Donate, Recycle, Sell or Trash. Old magazines and accumulation of ‘stuff’ over the winter makes this 2 a day goal a cinch.

Wall to Wall carpet: Since it's not practical to put your carpet outside, the next best thing is to sprinkle baking soda on carpets. Let sit for 15 minutes or so, then Vacuum clean.

Still Need an air freshener? 10-20 drops of Essential Oils like mint, citrus or lavender in a quart of water - spray around. I have found that 1/4 cup of Vodka in 1 quart of water helps to spread the fragrance around more fully. Use the bottom shelf, cheap vodka.

Need a quick scent? Try clear Vanilla with spray bottle top. The scent is inexpensive and delicious, though people may look for the fresh baked cookies! If you don't have clear vanilla, then try pouring a few drops of the regular kind onto a square of aluminum foil and heat in the oven at 170 degrees F for a minute or two.

Windows & Mirrors: (house and car)
¼ teaspoon grated soap or dish detergent
2 cups hot water
3-4 tablespoons vinegar
Mix well in spray bottle. Spray on wipe off with newspaper. Newspaper goes right in the compost heap.

KITCHEN:
General Cleaning-Solid Surfaces
Old fashioned Soap and Water applied with a sponge. Dish detergent in a pinch.
Scum/greasy deposits/burnt on crud: baking soda paste on sponge. Wipe around to remove.
Vinegar and water rinse to shine it all up.
(Don’t want your house to smell like a salad? 1/4 c VODKA in a quart of water (I use distilled). Add a few drops of Spearmint and Orange essential oils for added freshness!)

Microwave: Heat a mug of water with lemon wedge for 2 minutes. Steam works on cooked on stuff. Wipe clean with sponge. OR - just microwave your damp sponge for 1 minute. Wipe steamed walls clean. This also kills bacteria on your sponge allowing you many, many days of cleaning.

Garbage Disposal Freshener:
Use that microwaved lemon wedge to freshen it up. Oranges and limes work just as well. Once a week is usually enough to keep odors at bay. Baking soda and vinegar are powerful deodorizers that clean the source of the bad odor.

Slow Drains: Pour 1 cup baking soda chased by 3 cups hot water (boiling if your sink can withstand it). Is the drain still slow? This is more fun – 1 cup baking soda followed by 1 cup vinegar, then once the bubbles stop, pour hot (if possible boiling) water.

Rust Stains? Try vinegar. Spray on. Let sit. Rinse off. - OR - Borax on cut lemon half. Rub around a bit and rinse. I was AMAZED how well this worked on my tub and shower when the softener went on the fritz.

Mildew? Straight up vinegar. Spray on. Let sit a while. Rinse off. Not strong enough – Tea Tree Oil. Can't stand the smell of Tea Tree oil? Spritz on some peroxide. Use a toothbrush to finish the job.

Dishwasher: Many Ordinary dish detergents contain phosphates which end up in waterways causing algae blooms – suffocating fish. Use ordinary baking soda or washing soda with borax instead.
Recipes:
A)mix one part borax, one part baking soda and 1/4 part salt. Add white vinegar to the rinse cycle to get them squeaky clean!
B) I use a teaspoon each of liquid soap and baking soda in the cup of my dishwasher.”
C) Mix equal parts of borax and washing soda, but increase the washing soda if your water is hard.

Does your Dishwasher have unsightly stains or odor? Dump a package of unsweetened lemonade mix into the powder dispenser. Run a short wash cycle. The citric acid in the mix helps wash away stains and odors.

Furniture Polish
1/2 tsp olive Oil
1/4 cup vinegar or fresh lemon juice
Apply with soft cloth. Buff lightly to a shine that smells divine.

Stay tuned for more suggestions...

Make your day wonderful!
Shannon

Saturday, March 27, 2010

My 4 minutes and 15 seconds of fame.

This past week was a whirlwind of Sweet Teagan's activity. We were invited to be interviewed for a live segment on WREX TV13 out of Rockford. I had little (OK NO IDEA) what the angle of the interview would be, but was able to think fast on my feet at 6:20 am and not embarrass myself too much.

Strangely, the interviewer didn't see the point of an interview about soap prior to my arrival. I set up the most colorful soaps with a few full soap logs, a few scrubs in little stacks, a basket of bath bombs and one of lotions. The set started to smell like a soap store. The cameras started to roll and the interviewer picked up a few soaps to sniff while speaking. Once she opened the Peppermint Eucalyptus and gave a nice long sniff she became a believer. She called over the weather girl and they both oohh's and aaah'd until the end of the segment.

I was asked to not leave until after the show ended because everyone wanted to shop. OK. No problem. While they rifled through the 50 or so types I brought along I was invited to be a vendor at the Stateline Splendor Bridal Expo in 2 weeks. Eeeek. I was gearing up for the annual Garden Fair and had not planned for a Bridal Expo! What a great day!

I will be embedding the interview on the web store.

Friday, March 19, 2010

Tweeting - The Old Fashioned Way

I'm an old-fashioned girl at heart. Though technology has supported me and my family for the past few decades I have to face my country roots. "Tweeting" to me means birds. Actual birds.

Spring has officially arrived in Woodstock (just don't look out the window this weekend as the last snow of the season falls!). With Spring comes new life. We have officially doubled our laying hen flock. About a week and a half ago we added 3 Araucaunas, 2 Barred Rocks and One Rhode Island Red. This past Week we added 2 Buff Orpingtons and 2 more Araucaunas. It amazes me how fast these little buggers grow! The first bunch is more than double the size of the group we got only a week later! How is that possible?

My little girls are spending the rest of the cold days in a protected area in my second office. Even though that office is nowhere near a window, I hear tweeting non-stop. It makes my heart smile.

Friday, March 12, 2010

A New Chapter To My Destiny: Sweet Teagan's

For the past couple of decades I have toiled away, like many people, earning money for someone else. When I 'retired' last year I needed something to keep my mind sharp, so I started a small business. I took a hobby that I loved, soap making, and built an honest to goodness business.

The process brought back many years of college education and work training. I'm the CEO, CFO, CIO, Marketing Manager, Ops Manager, cleaning crew and everything in between. The hours are long, the pay low and the intrinsic rewards priceless. The most recent accomplishment that makes my dear Sweet Teagan's seem 'real' is the web store: http://SweetTeagans.com.


It amazes me to watch web visitors from all over the world browse my site. Admittedly, the first time I saw a guest online I had a feeling of panic. What am I doing?!?!?!? Then the comments and orders come in and the link gets forwarded and I remember what it's all about. Good or bad I make the decisions. So far it's all good.

Take a chance. You never

Talking Turkey

It almost seems sacrilegious to talk about turkey in March, but I had one left over from Christmas. I was proactive last November and purchased two fresh Amish turkeys: one for Thanksgiving and one for Christmas. We ended up going to the in-laws in Ohio for Thanksgiving, so I ended up freezing BOTH fresh turkeys. We did roast one in the traditional fashion for Christmas, but the Thanksgiving bird was just taking up space in the deep freeze.

After thawing slowly in the refrigerator for about 3 days, I propped him up on a can of beer and slowly cooked him on the Weber grill. It took about 2 1/2 hours for the 11 pound bird to cook. He came out golden brown, crispy skinned delicious. I didn't brine this one, so he wasn't as moist as I would usually like. I also didn't do anything to spice him up - very unusual for me.

After cooling overnight in the fridge we carved off all the 'good stuff' for sandwiches, soups and pot pie leaving the unsightly naked turkey corpse. That stuff has not fulfilled its full turkey destiny - yet. Into the stock pot with any vegetable scraps it went covered with just enough water to ensure it all swims. Then, as Chef Anne Burrell chants, "BTB-RTS-STS" - bring to boil, return to simmer, skim the scum. After simmering for a couple of hours the bare bones are sent to the trash while the little bits of meat go to the dogs. The rest is strained off reserving the liquid for some special stuff!

Turkey Stock
I cannot believe how many people spend good money on stock that is loaded with preservatives and salt. It is so easy to make your own that there's really no need. The plus for me is it falls into the Waste Not Want Not category. Make chicken, beef or pork stock using these same steps.

Ingredients:
1 turkey carcass
any vegetable scraps you have around (we save onion skins, celery tops, carrot peels, whatever is around)
Water to barely cover

Process
Dump it all into a stock pot. Bring to boil, reduce to simmer for a couple of hours. Cool a bit. Strain stock into smaller containers to use/Chill/freeze.

If you're feeling adventurous (or if you forget it's on the stove like I did) simmer the strained juice for a while longer to concentrate the flavors.

What's Turkey Stock Good For?
Use it in place of water to cook rice, beans, lentils, barley (get the picture?)
Make soup
Make gravy for Turkey Pot Pie (that's for tomorrow folks!)

Be happy!

Monday, March 1, 2010

Crock Pot Braised Pork Chops

For those people out there who don't have time to cook, or cannot afford to eat healthy food because it's sooooo expensive, here's another recipe for you. Keep in mind that I treat food recipes as starting points. Sometimes when the mood strikes I will modify quantities and sub out ingredients.

Tonight we enjoyed Crock Pot Pork Chops. I purchased a bulk package of pork chops a couple of weeks ago and froze portions in vacuum sealed bags forgetting to brine them. To me, defrosted pork chops seem to come out dry if not brined - that is UNLESS YOU BRAISE THEM.

Ingredients Used:
3 boneless pork chops
1 large onion
2 apples
1 can diced tomatoes with juice
2 cups Chicken broth
1 cup or so red wine (it was on the counter, so why not?)
2-3 Tablespoons Apple Cider Vinegar
Fresh ground pepper - to taste
A handful of shredded red cabbage (it was in the fridge and looked pretty...)
3-3 large carrots, peeled cut in half

Step 1: Brown pork chops in sautee pan in a little oil (I used Olive). Get a nice caramel color on both flat sides. Transfer to crock pot

Step 2: Sweat onions - in the same pan the chops came out of. Lightly sweat - not caramelize. Put that into the crock pot.

Step 3: pile the rest of the stuff in. No particular order. Just make sure the chops are on the bottom.

Step 4: Cook long and slow all day long. It will be ready when you get home. We actually started it late on Sunday and realized too late that we didn't get it started in time. I cooled the crock, chilled over night then put back on the heat for a few hours today.

We didn't make any sides for this, but a nice egg noodle or rice would be nice to soak up the broth. I could have reduced the liquid as a thicker sauce, but didn't. It was bowl slurping good as it was. The whole dinner (with plenty left over for lunch tomorrow) totalled about $10.00. This was FAR less money than any fast food place for dinner and sooooo much healthier.

Enjoy!

Monday, February 22, 2010

Noodles and Chocolate Pudding

As you have probably read, we have an abundance of eggs. Using chicken eggs seems easy. Omelettes, fritattas, scrambles, hard cooked, salad, you get the gist. What is more difficult is using the duck eggs. I suppose I should 'man up' and just try one outright, but the thought of tasting too strong of an egg has me hesitant. Instead, I bake with them. Sunday night I wanted something tasty, yet a bit healthy to eat. I didn't feel like meat, so Teagan and I made some semolina egg noodles. The fresh cooked noodles we then stir fried into vegetables with a bit of parmesan cheese. This is one super way to get veggies into my family.

Semolina Egg Noodles
2 Egg yolks (we used duck)
1 cup Semolina Flour
1 cup AP Flour
1 T Good Olive Oil
1 Pinch Salt (we used kosher)
a little water.

I used my Kitchenaid paddle mixer to mix all ingredients together and knead. The mix seemed a little dry, so I added cool water 1 tablespoon at a time until the mixture was a smooth ball. Then I wrapped the dough ball in plastic wrap and chilled for a couple of hours.
When ready to cook, Teagan and I rolled out 1.4 of the dough at a time on the pasta maker and cut them using the wide noodle setting. 3 minutes simmering in salted water and they were done.

Veggie Stir Fry:
I cleaned the freezer on this one. Broccoli florets, cauliflower, carrots in different colors, pea pods. I steamed the veggies to get the cooking started, then transferred them into a preheated (hot) wide skillet along with 1T olive Oil and a pinch of salt. I added a can of diced tomatoes with the juice and tossed around for abut a minute. Then I added the noodles and tossed it around to coat the noodles with the juice from the pan. Sprinkled a tablespoon or two of parmesan cheese into the pan to heat and served. Yummo. We had enough for 2 servings each for dinner and a lunch the next day.

Dessert Time: Chocolate Pudding A La Teagan
1 cup chocolate milk (she never finishes the little bottles from lunch time
1 cup whole milk (we use organic)
4 t Corn Starch
1/2 - 2/3 cup cane sugar (more or less to taste)
2 squares unsweetened baking chocolate
a handful of mini chocolate chips - because they were there
1 t Vanilla

Step 1:
Combine sugar, corn starch, 1 1/2 cups milk and the chocolate to a sauce pan. Warm through to gentle simmer

Step 2: beat egg yolks lightly in a bowl with 1/2 cup milk

Step 3: temper egg mixture with hot milk/sugar/chocolate.
Pour 1 - 2 tablespoons of the hot milk into the egg mixture while stiffing/whisking. Continue to add hot milk slowly until about 1/2 of the milk mix is mixed into the eggs. Return the tempered egg mixture back to the pan and bring to simmer stirring constantly for about 2 minutes. The mixture will thicken and coat a spoon. Turn off heat and stir in vanilla. Optionally you can add a butter pat to make it even more decadent and silky.

Pour into either separate bowls (around 6) or a single bowl. Cover with plastic wrap to prevent 'skin' from forming. Chill thoroughly.

Serve either as-is or topped with whipped cream. This stuff is amazing frozen into ice cream. Add slivered almonds for a little texture. Your imagination is the limit.

Enjoy!

Friday, January 22, 2010

Two things. (aka Inertia is contagious)

One of my favorite places to spend quality time is on a soap making forum called the Soap Dish Forum. Not only do I get inspiration to make new and unique soaps, lotions, bath bombs and the like, I pick up ideas to simplify my life.

Around Christmastime '09 the topic came up about the Great Decrapification of 2010. Everyone has crap. Don't lie. If you say you have no crap you're full of crap. A few dozen "dishers" took the challenge and have been organizing, donating and just plain trashing the stuff that has accumulated in their homes and offices. We each confess every few days. This causes other dishers to catch the tossing bug. It feels really good.

I am no stranger to decrapification - or collecting crap. Last year I spent the first month of my retirement going through every nook and cranny of my home and organizing. I found bags and bags of old paperwork that we didn't need any more. Sorted and filed all of the user guides and tax info in waterproof boxes, junked pens and pencils that no longer worked. You get the drift. I found $241 in loose change and around 50 Euros in the process. It was good. I try to keep up with cleaning, but crap just multiplies on its own.

Doing a major decrapification is a pretty big undertaking. Another Dish thread introduced the notion of keeping things simple. Just toss 2 things a day that you no longer need. Over the course of one year that would be 730 pieces of crap out of your life. It's so doable. Truthfully, you can make the 2 things a day with a pair of holey socks or pens with no ink. What generally happens is you look at things a bit differently. As you explore areas of your home you'll find far more than 2 things. In no time you've emptied a lot of crap that had no meaning to you but took space and time to clean. An added twist is to toss 2 things for every one new thing you bring back into the house. It makes you really think about purchases.

Here's where I'm at:
Day 1: Bathroom Vanity. Junk piled 6 jars of lotion and hair product that I didn't like. Oddly it had been in there so long most things had started to separate. 3 Mascaras that had dried up. Eye shadows that didn't suit my skin tone. Air freshener that made me sick to my stomach. That was more than 12 things in 2 minutes. Open shelves and a clean vanity top. Good start.

Day 2: Kitchen - Baking cabinet. I pulled a chair over to stand on to survey the top shelf and discovered 3 jello instant puddings, 4 jello gelatins, 1 box of gourmet cake mix, evaporated milk, 2 boxes of crackers, Cake decorations, frostings an industrial size container of garlic powder all expired. At least 15 things in 2 minutes. New rule: I am not allowed to use the top shelf for ANYTHING!

Day 3&4: Soap Studio. I've been feeling constricted lately. I shouldn't have to add on to the house to make soap. I'm not so big as to need that room. My studio is 15 x 20 with cabinets and countertops on 2 full walls - plenty big to do whatever I need to do. The problem: the cabinets were full of crap from when we moved in. I pulled out 5 frying pans moved from upstairs when I replaced them with new non-stick and stainless steel. A coffee percolator for parties, cru de te trays, computer parts and keyboards. The worst was my own stockpile of little bottles, cans, containers and such that I kept for temporary molds. Really? Will I ever use 6 pringles cans for soap molds? I love making logs. Out they went. Essential oil and fragrance bottles. That was harder. Sometimes I like to huff from bottles to compare scents between vendors. Some went. Some are honestly still there.

I added four stacking 8 foot wall shelves to line up the curing soap. Moved all of the empty molds to one location and arranged fragrances in wire shelves along the wall. I can now see exactly what i have and how much of it. I added 2 more spice rack type of wire shelf where I mix everything up. Nothing on the counter except the mixing pails. Added cork squares on the cabinet doors to pin up the recipes I'm working on. I made 2 batches of soap with all the space in the world. No more tipping over bottles in a cramped space. I feel so energized! Creative juices are again flowing.

Tomorrow: The storage room. Sweet Jesus I am not looking forward to it. If I just focus on 2 things. Two measly little things, perhaps I'll get the job done. 2 Paperback books. 2 coffee mugs. 2 old dog blankets. I can do that. In about a month that room should be back in ship shape. 2 things.

Saturday, January 9, 2010

Coffee Break


I recently joined a coffee swap with a group of people in my favorite Soap Forum. Initially I planned to venture to downtown Chicago to pick up a few pounds from Intelligentsia. I like their coffee and their story, but not enough to pack up my 5 year old daughter during one of the coldest spells of weather this year and trudge through the Windy City.

So, instead I let Google lead me to a place more local. I struck GOLD in a neighboring town. Conscious Cup is a roaster that makes their magic in the restaurant in front of their giant window. Each week day morning they put on a show of the tastiest kind. I had a cup of their "Nicaragua" yesterday while Teagan munched on an oversized chocolate muffin. The coffee was light and smooth. Even at 4 O'Clock in the afternoon I didn't feel the caffeine jitters. Got a good night's sleep and awoke looking forward to my day.

I told the coffee expert behind the counter that I was looking for something smooth with little or no bitterness for my swap. She directed me to an organic free-trade variety from Brazil. I love me a good strong cup of Starbucks, but am trying to reduce the amount of sugar and cream I need to enjoy the cup. I'd like to learn to like coffee 'black' but cannot seem to get used to the taste without the amendments. Sitting here with a tall steaming cup of the Brazil blend I am on my way toward achieving my goal. It took no sugar and only little heavy cream to make my palate happy. It's much lighter than the Winter Blend that was in my coffee grinder before, but I really like it so far.

Thank you Google. Thank you Conscious Cup. Please excuse me while I return to my coffee break.

Tuesday, January 5, 2010

Jambalaya Tuesday

When it's cold outside my family craves comfort food. Tonight I felt like taking a dinner trip away from the icy Midwest to somewhere in the Creole part of the country. I made our version of Jambalaya. Jambalaya Purists may not agree with my ingredient choices or of the methods, but our appetites were satiated for sure.

Ingredients:
12 or so Shrimp - peeled and shelled (the 41-60 per pound size)
2 Boneless Skinless Chicken Breasts - cubed roughly 1-1.5 inches
1/2 Kielbasa (or smoked sausage, anduille, chorizo, etc. whatever you have and like)
1 can diced tomatoes (12.5 oz I think it was)
1/2 large sweet onion cut into 1/4-1/2 inch pieces
1/2 chopped green pepper
1 large clove of garlic - minced
a few Bay leaves
1 T or so of Worcestershire sauce
2/3 cup or so of long grain rice
2 cans chicken stock
1-2 teaspoon vinegar (I used Apple Cider Vinegar)
2 Tablespoons or so of Olive Oil

Seasoning for meat:
2 teaspoons paprika
1/2 teaspoon kosher salt
1/2 teaspoon garlic powder
1 teaspoon white pepper
2 teaspoons ground cayenne pepper
2 teaspoons oregano

Step 1: Veggies
Pour olive oil into a warm-hot pan
add onion and green peppers. cook 1-2 minutes - until they are barely soft
Add garlic - cook 1 minute. Do Not Scorch The Garlic!
Dump in the can of tomatoes with juice, Apple Cider Vinegar and Worcestershire Sauce. Cook another minute or so
Add rice. Cook a minute or 2. Stir
Add chicken stock. Simmer while preparing meats.

Step 2: Chicken
Toss cut up chicken with 1/3 of the seasoning
Lightly brown in an oiled sautee pan
Stir partially cooked chicken to simmering rice mixture

Step 3: Shrimp
Toss thawed peeled shrimp in 1/3 seasoning mix
Cook 1 minute per side in the chicken pan just to being pinkish..
Stir partially cooked shrimp into simmering rice

Step 4: Sausage
Toss sliced sausage in remaining seasoning mix
Fry in the same pan until slightly golden
Stir sausage into the simmering rice.

After about 20 minutes the rice part should be done. Take a taste of the rice for doneness. If your rice takes longer to cook, then allow the mix to simmer until the rice is fully cooked.

Scoop into bowls and enjoy. B says this would go well with an ice cold beer.

This recipe made enough for 2 adults for dinner and a couple of lunches - probably 6-8 servings.

We cleansed our palates tonight with lemon curd and cream crepes.
Ingredients:
2 crepes (made last night. See yesterday's post for details)
2 Tablespoons of Lemon Curd
3/4-1 cup heavy whipping cream
2 Tablespoons confectioners sugar
1 teaspoon vanilla

Whip cream, sugar and vanilla to soft peaks.
Gently mix lemon curd with 2/3 of the whipped cream mixture
Spread 1/2 of mix onto middle of each crepe. Roll up burrito style. Top with a dollop of whipped cream.
Enjoy

Monday, January 4, 2010

What do you do with Duck eggs and a bunch of lemons?

If you've read early posts, you know that we made a home for a pair of Pekin ducks. The lady Pekin, Ming Ming, had begun laying eggs like a little machine. Not having taken the big leap of faith to eat a duck egg straight up, I use them to bake. Christmas week I made banana bread with them. They are marvelous. Today though, I had a different problem.

I need a vessel to hold some leftover Beef Bourguinon from yesterday. I don't want biscuits again, so I thought why not go all out French tonight? I have Crepe batter chillin' in the fridge right now.

Crepe Batter:
1 cup cold milk
1 cup cold water
1.5 cups flour
4 tablespoons warm/melted butter
4 chicken eggs (I used 2 duck eggs - those things are HUGE)
Mix up the mess in your blender. (Don't tell B that I used the smoothie machine. The blender was liberated to bath fizzies)
Let the mix sit in the fridge for a few hours.

Cook the crepes in a large pan (about the size you want your finished crepe to be)
Fill the crepe with whatever you feel like having
Eat (the best part)

So, we'll be having the beef as the main course. You can add a side of boiled potatoes or mashed potatoes. I think I'll stick to a green salad tonight.

Having more duck eggs to use and spying a bag of lemons when I put the crepe batter into the fridge, I thought of something: Lemon Curd. That would make a nice dessert crepe. Diet, Schmiet.

Lemon Curd:
1 cup sugar
5 egg yolks (I used 2 duck yolks and one chicken yolk)
1/3 cup fresh squeezed lemon juice (3-5 lemons depending on size and how old the lemon is)
1 stick butter
lemon zest from juiced lemons (this is simplest before you juice your lemons)

Step 1: Begin the emulsion
Beat the egg yolks, sugar and lemon juice in a large bowl until they seem blended together. I used a whisk. It took about a minute to complete.
Step 2: Gently cook
Place the bowl over a simmering pot of water. The bowl should NOT touch the water. Bad things will happen. Trust me.
Keep whisking while the mixture cools. Some recipes say to heat to 160F. Basically, you'll see the texture lighten up as it nears the right temp. It will coat the back of a wooden spoon. Drag your finger through the coating and your finger path will remain there. This step took me about 5 minutes
Step 3#: add the luscious butter
Add your room temperature butter 1 tablespoon at a time. Whisk it in until you can't see it any more before adding the next bit of butter. Repeat until there's no more butter. This step took about 2 minutes.
Step 4: Add the zest.
Step 5: Enjoy.
Smear it on toast, scones, crepes, ice cream, as a layer in cakes, cookie sandwiches, whatever. This recipe filled a pint sized canning jar with a few good sized spoonfuls for the chef. It's chilling in the fridge now waiting for tonight's dinner to make its entrance. It will thicken A LOT while cooling. Kept in the fridge it will last up to 2 weeks (yeah right this stuff will be gone by tomorrow). You can freeze this stuff too.
To me it tastes like a sour pudding. Work slowly and at a low enough temperature and it will be smooth as silk. Rush it and you'll have lumps. Ick. Take your time, it's worth it.

Happy Food Dreams

Happy New Year!

A kind "Disher" help to remind me that it has been a very long while since the last topic. Once I turned 40 last September, the year just kind of escaped. As you can imagine, the holiday months were busy and simply flew by, leaving me at January in Chicagoland where I have to look forward to cold, cold and more cold. On the bright side, I'm only looking at about 10 more weeks of it before Spring.

Filling time is pretty easy. I have so many hobbies that I run out of time to do them. One of my favorites is cooking. Yesterday I made a traditional Bouf Bourguignon. What a fancy name for a beef stew with red wine. I don't often follow an exact recipe, but rather take bits and pieces from many other recipes and follow instinct on the rest. Here's what I did:

Beef Stew with Red Wine:
2 # Sirloin Roast cut into 1 - 1.5 inch cubes.
A bunch of Carrots peeled and cut in half so they were about 5 inches long. I love carrots, so I used about 8 large. Not traditional, but it's my recipe!
Celery - I love celery in stews - 5-6 large ribs cut in half to make 5 inch long pieces
A small bag of peeled pearl onions. Frozen is OK. (Peeling Tip:boil the whole onions for 2 seconds. The peels fall off with nearly no tears.)
2 cans of stock (I had no fresh available, so I used 1 chicken and 1 beef I had on hand.)
A bottle of Red Wine (Used Menage a Trois today).
A little flour
A couple tablespoons of veg and.or olive oil
A few Bay Leaves

Step 1: Brown the beef
- My beef was partially frozen from the fridge (woops...). If it were thawed I would have dried it with paper towels, but it was dry being frozen. Put a handful of beef in a hot pan with olive oil. Brown all sides, then move cubes to a bowl while the next batch of beef browns.
- When all beef is brown, sprinkle a bit of flour on the cubes and return to pan to form a little crust.
Step 2: Load the crockpot
- Move beautiful brown beef into crock pot set on low.
- Deglaze beef suate pan with 1 cup wine. Reduce to a few delicious tablespoons and get every last bit into the crockpot.
- Add vegetables, bay leaves and stock to the crock pot.
- Wait patiently all day long with tummy rumbling in anticipation
-Had I thought to buy mushrooms I would have cooked them down in butter and oil at this point.
- Make your side(s). Potatoes go well with this!

Step 3: create the sauce
- About 30 minutes before ready to devour, pour crock pot liquid into a wide sautee pan.
- Reduce by 2/3
- Add 2 cups of wine to the reduced liquid.
- Reduce again to equal roughly 2 cups.
-Season with pepper, herbs, etc. as you like.
Step 4: EAT!
-Remove bay leaves (if you can find them easily)
- Spoon crock pot contents into bowls
- Add some sauce
- the rest is history.

We had fresh buttermilk biscuits as a side. They come in very handy to sop up and stray sauce.
Buttermilk biscuits
Ingredients:
2 cups AP flour
2 tablespoons lard
2 tablespoons cold butter
1 teaspoon baking powder
1/2 teaspoon baking soda
Pinch of salt
Pinch of sugar
1 cup Buttermilk
Step 1: Bowl ingredients
Combine all but buttermilk in a bowl until the mix resembles crumbs or very small peas.
Add 3/4 cup buttermilk and mix around. If the mix seems dry, add the remaining 1/4 cup.
Mix slightly.
Step 2: Knead and Cut
Turn mix onto counter (I use wax paper at this point)
Knead 4-6 times, then flatten the mixture out in a disc roughly 3/4 to 1 inch thick.
Cut into whatever shape suits you. I make 4 inch circles with frilly edges, but that's me.
Ste 3: Bake
Bake in 425F oven for 11-14 minutes - when they just start to turn golden brown and delicious.

Happy winter!