As a member of TheDishForum, I like to participate in several research swaps each year. Fragrance swaps are one of my favorites because we get to sample 50+ scents in one go. Making small test batches for these swaps requires small-ish molds. I generally like to make 16 oz batches so that a 1 oz bottle is used up in. a single batch. Here are the steps I used to make a triple log mold made totally to my bar specs for about $5.00. these little molds are absolute workhorses and paid for themselves after the first use.
Custom Triple Log Soap Mold for $5.00:
Materials:
- 6mm (1/4 inch) Craft foam (found at craft supply houses like Hobby Lobby)
- 1 sheet of Foam Board (the kind used for presentations that stands up on its own)
- Duct Tape (I personally use Nashua Brand)
Tools:
- Exacto Knife or razor knife or box cutter
- Ruler
- Self Healing mat (Didn't want to cut the table!)
Steps:
I wanted 6.25 x 3.25 x 2.5 inch logs for this swap, so I started cutting the foam into:
- one bottom piece (6.25 long x 3.25 wide)
- two long sides (3 tall x 6.25 long)
- two end pieces (3 tall x 3.5 long)
NOTE: MAKE SURE YOU USE THE 6mm craft foam. The 3mm and 2mm will not work for this application. They are simply too thin and tear very easily. I found bigger sheets of the 6mm on Ebay to make larger block molds.
Note2: Don't use the cheapo Dollar Store craft foam. The sheets are too thin and the color may leach onto your soap. these things will last you a very long time. Invest in the $1 sheets for the better closed cell foam.
I duct taped one side at a time to the bottom piece and then ran extra duct tape all around the outside to ensure it would all hold together. The little mold/liner ended up being waterproof and only bowed slightly when filled to the top with soap without any other support. I made 3 of these and they all worked out the same. They're not going to win any beauty prizes, but I like the colored duct tape
 .
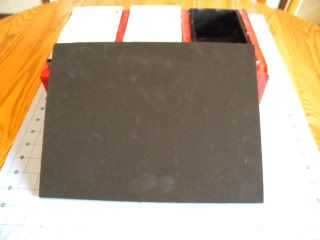
.Wanting a little more support on the sides I made a frame for all 3 liners out of ½ inch rigid foam board (used for presentations). $5.99 for a poster board on sale 50% off for $2.98). I used half of the sheet for this project. I cut out a base, 2 long sides, 2 short sides and 2 internal spacers and duct taped it all together. Sweet success.The liners fit snugly and pop out easily to unmold the soap.
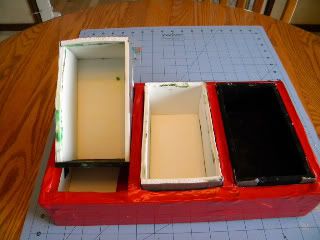
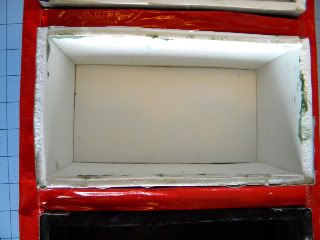
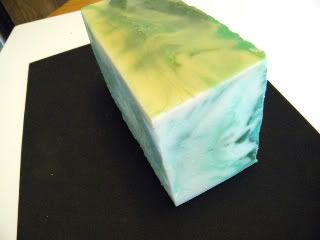
The photos of the whole setup were taken after the maiden batches. I didn't clean them so you could see how cleanly the soap unmolds. The soap unmolded perfectly after 12 hrs. It literally popped right out of the liners. The formula I used was high in castor (10%) and usually sticks a bit even to the mylar liners I have made before. (I did let it fully gel) Photo below is of log on its side to show bottom corner. Check out the sharp corners and smooth sides. (No wasted end cuts!)
Costs for this triple log set up:
- 3 pieces of 6 mm craft foam (.99 each x 3 = $3)
- ½ sheet of foam core board ($1.50)
- Duct Tape (2.99 for the whole roll" let’s be generous and call it $.50 for this project)
- Total: $5.00 for 3 custom molds.
- Time: 10 minutes per liner. 10 minutes for the holder: 40 minutes including interruptions.
Note: The 6.25 inch logs I chose to make can be cut into 6 one inch bars (4.5+ oz) or 5 1.25 (5.5+ oz) inch thick bars with no wasted ends. I plan to reuse these for many, many, many small test batches. I would not go much larger with this foam-only system simply because the foam board and craft foam are not nearly as strong as wood.
I have also made large block molds and log molds using this foam liner method. They work brilliantly and last for countless batches. Occasionally a batch gets very hot in the mold and makes little moon craters on the outermost sides of the log/block. These scrape off effortlessly with a plastic scraper. In all honesty, once cut and packaged nobody ever notices the edges so I don't worry about it at all.
Fragrance does not stick in the foam since it's a closed cell material. If I get really messy and the liners seem dingy, I can just scrape them with a wooden spatula. They can be washed, just be aware that duct tape isn't friendly with water and your seams may begin to leak. Slap on a new piece of duct tape and you'll be back in business.
I hope someone finds this useful!
I find it useful! I've been using these craft foam liners in my (homemade) wooden log molds 4-5 months now with dozens of batches. They are so easy and no more wasting paper liners.
ReplyDeleteI have found that the thinner foams make my soaps sort of bubble next to the liner with some ash on the sides (not the tops), so it's not a smooth side with those foams. Maybe something in the cheaper foam is reacting and releasing gas to create that texture?
And I wash my liners with soap and water - duct tape and all. I've probably washed each one a dozen times or more and the duct tape is still holding the seams together. I'm sure they'll fail at some point, then it's just 2 more strips of duct tape.
So cheap and easy - I feel like I'm cheating.
it's possible about the outgassing with the thinner foam. Not all EA foams are the same. The thinner material also warps over time. It tears fairly easily too. I've never had that problem with the 6mm.
ReplyDeleteI know I'm no longer wishing for those expensive silicone liners!
I am new to the soap making scene, and these wonderful suggestions are so interesting, such creative people, very clever. Thanks
ReplyDeleteThank you sooooo much for your post. This is the best mold I have ever used.
ReplyDeleteUnfortunately, when I unmold my soaps, I got little craters on the sides of the log.
(No need to put it in the freezer, BTW)
I used Canola oil to prepare the molds. What did you use to get such perfect sides?
Thanks
I too sometimes get craters. Have never oiled the liners or anything.
ReplyDeleteSmoothness depends on a few things - the actual foam (not all are created equal) and how hot the soap gets in the mold. I don't sweat the craters though. A quick once over with the putty knife before cutting into bars and the edges are smooth enough.
Truth be told, customers have never even noticed if the sides aren't smooth as glass. Once packaged and cured the bars always look great. I think we're our own worst critics =)
Thanks for reading!